Working with Data
Designer enables you to integrate your forms with data by binding your form objects to a data source or schema, formatting your data fields with patterns, and validating your user’s data directly in the form.
Data binding
Data binding is the process of mapping your form objects to elements in a data file. Typically, you’ll bind your form objects to elements in an XML schema or an XML data file. You can see a field’s data binding with the Binding tab of the Object palette (shown here). The Binding tab is one way to set a form field’s data binding.

Here are the options for data binding.
- Use name: When you drag and drop form objects onto a blank form; Designer will create an implicit data binding, and the XML data associated with your form will use the form structure and field names in your form. Designer refers to implicit binding as Use name which means you are using the names of your form fields for the names of the data elements.
- Use global data: If you set a form object’s binding property to Use global data, all other form objects with the same name will have the same data value. For example, if you have four Text Field objects with identical names and one of the objects is set to Use global data, they’ll all be set to Use global data. This is referred to as global binding. If a form filler changes the data in any one of these fields, the data in all the others will be replicated to match.
- Use DataConnection: Data Connection is the process of binding your form fields directly to a data connection like an XML schema or other data source. The exported data from this type of form will have the same structure as the data source. This type of binding is often called explicit binding because you’re explicitly connecting a field to an external data source.
- No data binding: When a field is set to No data binding, it doesn’t participate in the data binding; data will not flow into the field, and data will not flow out. All fields and subforms that don’t need to have data imported or exported should be set to No data binding to improve the performance of importing and exporting data.
This illustration shows an example of DataConnection binding. The icons to the right of each data node indicate that the node is bound to a form field.

There are two ways to set a form field’s binding to a data connection.
- You can use the Binding tab of the Object palette as shown previously.
- You can drag and drop data elements from the DataConnection to your form fields (as shown above).
Note: In addition to these typical binding methods, you can also use JavaScript to import data and bind it to your form objects. This is helpful when you need to perform some scripting logic on the data in addition to binding it to the form objects.
Data formatting
Designer enables you to control how data is displayed in your form and how it’s formatted when it’s exported from your form.
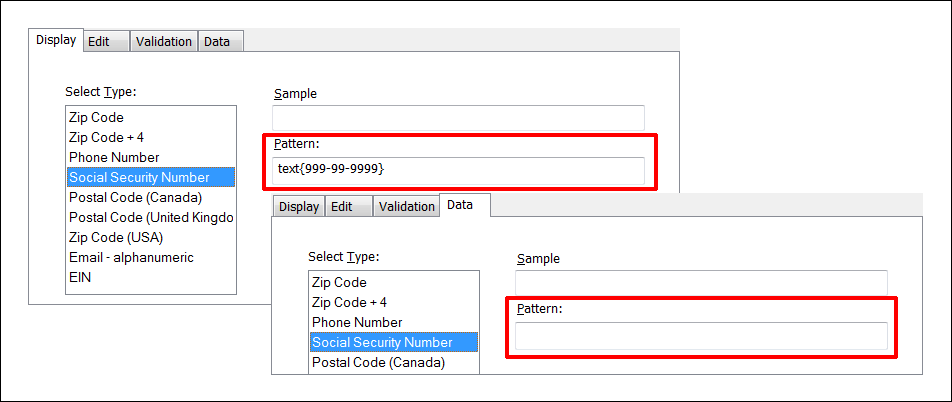
- You can add a Display Pattern to a form field to format the display of the data for the form filler.
- You can also add a Data Pattern to format the exported data that comes from the form.
As shown here, the US Social Security number has a Display Pattern but not a Data Pattern. So, the form filler will see a social security number with the dashes but the exported data will just be the numbers.

Data validation
Data binding and data formatting are closely related to data validation in Designer. Data validation is the process of checking the data on an interactive form, and Designer provides many methods and tools. You can validate data with patterns and with JavaScript. Designer also includes powerful visual tools to help you with form validation and you will use these tools in the exercises. There are two primary strategies for data validation.
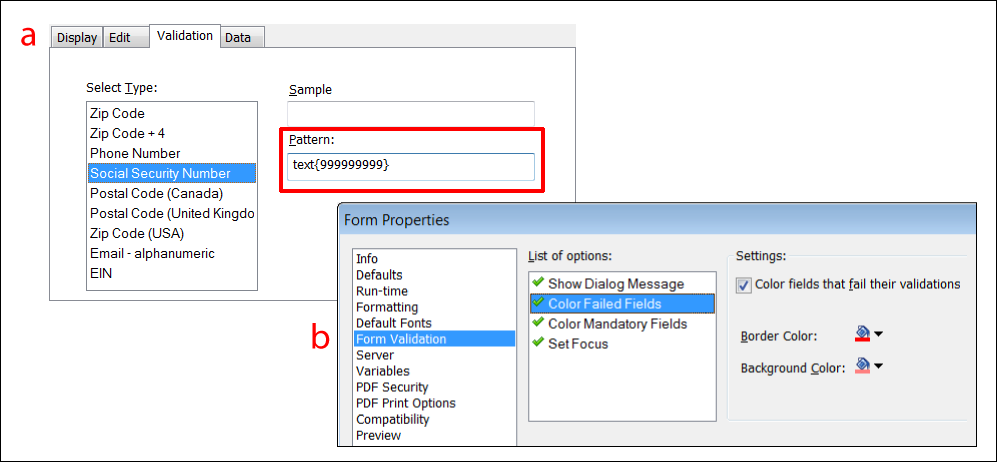
- Field validation: You can validate data as a user fills in each field. You can do this with Validation patterns (a in the illustration below) or with JavaScript.
- Form validation: You can also validate the entire form when a user submits the form. In this case, you are typically validating that the user has completed all required fields. You can create form validation with Designer’s Form Validation tool in the Form Properties dialog box (b in the illustration below).


