Dynamic Forms
Now that you know where everything is, let’s review some important concepts about dynamic forms: master and body pages, subforms and flow, and tables. These are usually the concepts that trip people up when they start creating Designer forms. By mastering these ideas early, you’ll avoid many pitfalls when designing and implementing your forms in the later exercises.
Master and Body Pages
Designer documents consist of master pages and body pages. Master pages define the layout and background elements of your form. You should put common page items like page numbers, repeating logos, and footer information on your master pages. Body pages should contain all the form objects that are unique to a particular page.
When you’re working with multipage forms, it’s quite possible that you’ll need a different look and feel on different pages. For instance, an account opening form may require three pages of interactive objects and six pages of legal text in columns. In this case, it makes sense to define two different master pages: one for the body pages with the interactive objects and one for the body pages with the legal text.
Master pages
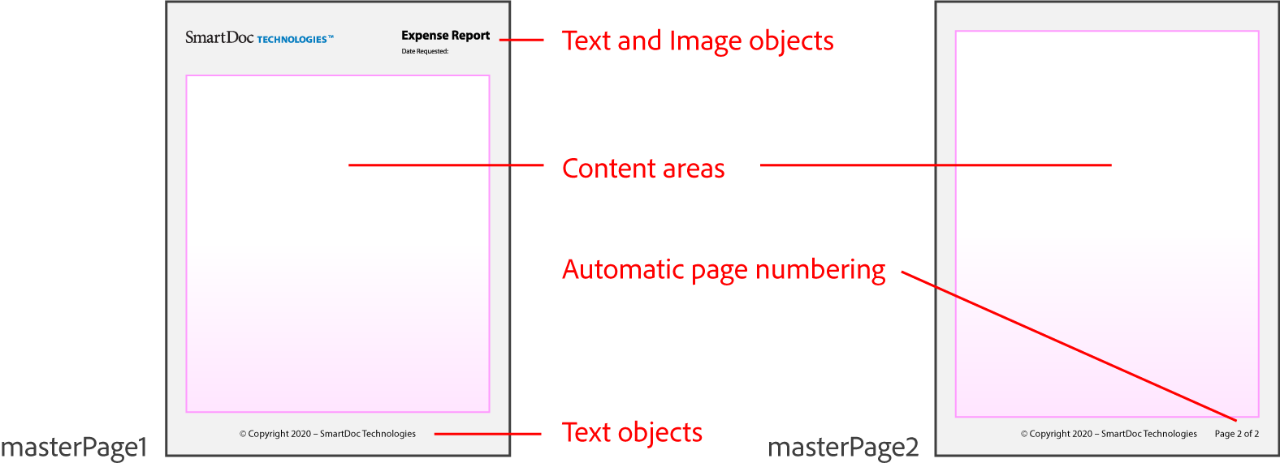
You edit your master pages in the Master Pages tab in the Layout Editor. If you don’t see this tab, choose View - Master Pages. Every Designer file must have at least 1 master page. The SmartDoc Expense Report (from the Student Files) has two master pages. The first master page (masterPage1 on the left) contains the document’s header on the top. The second master page (masterPage2 on the right) contains automatic page numbering on the bottom.

Both master pages contain Content Area objects which are the pink boxes. These objects define the outer bounds of the layout area for each associated body page. Content Area objects are particularly important for dynamic forms with flowing content. In the SmartDoc Expense Report form, the content area on masterPage2 is larger than the content area on masterPage1. This larger content area means the body pages associated with masterPage2 can display more information than the body page associated with masterPage1. Content Area objects are regular Designer objects and are found in the Standard Object Library palette.
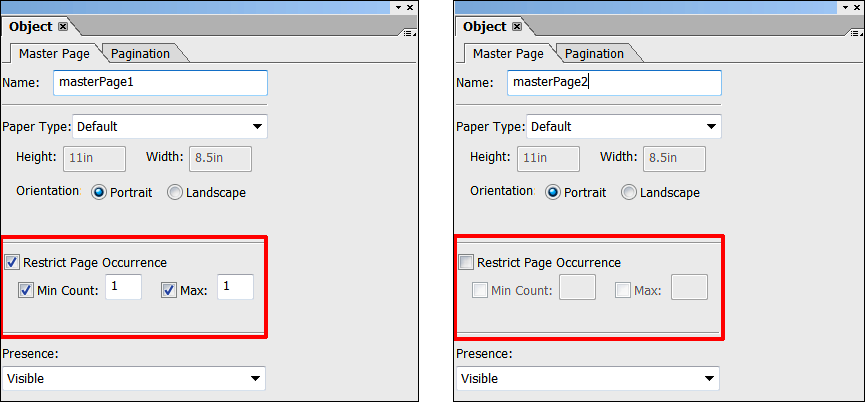
The SmartDoc Expense Report is a dynamic form, and a dynamic form can grow to accommodate every data item. Whether it has 1 page or 1000 pages, it will always have one instance of masterPage1. This is achieved by setting the Restrict Page Occurrence property on masterPage1 as shown in the illustration on the left. So the master page with the logo and header will only appear once and will always appear once, on the first page.
However, notice in the illustration on the right that masterPage2 doesn’t have any page restrictions. Since it is the next master page in the hierarchy, it will be used for page 2 and for all subsequent pages in the dynamic form.

Body pages
Most of your form objects will be placed on body pages. Each body page will reference a master page. You can view your body page objects by switching from the Master Pages tab to the Design View tab in Designer. Body pages are subform objects in Designer and as such are treated just like any other subform.
Subforms and Flow
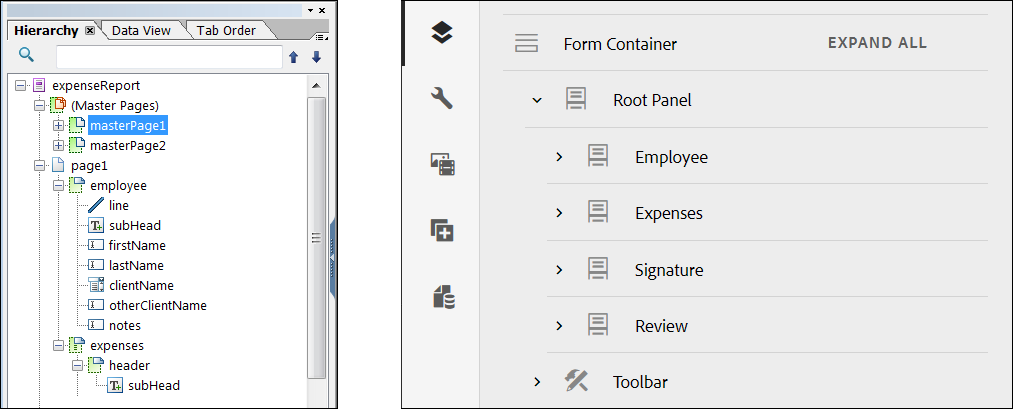
A subform is a container for 1 or more form objects. Subforms define the structure of your form, and you can nest a child subform inside a parent subform. In fact, there’s no limit to the nesting you can do with subforms. Subforms in Designer (left) are like panels in AEM adaptive forms (right).

The child objects of a subform can be positioned or flowed within the subform. You control this with the Content property of the subform. Subforms can be set to Positioned which will enable you to place your child objects on an X/Y grid relative to the subform. Subforms can also be set to Flowed and there are 3 different flow directions for the child objects: Top to Bottom, Western Text, and Right to Left. You will see each of these examples in the exercises.
Subforms work in conjunction with the content areas that you learned about earlier. Content areas control where objects are located, and subforms control how objects are placed as the form is rendered. By grouping certain objects together in a subform, you can be assured that they’ll be consistently positioned relative to each other as the form is rendered.
Depending on the incoming data or the user interaction, subforms can be repeated, expanded, or hidden. Repeating and expanding subforms are ideal for forms with repeating data like the SmartDoc Expense Report. Repeating subforms are child subforms that are placed inside an expanding parent subform. Because subforms are separate, independent sections of a form, they can be hidden or shown based on the needs of the user or other business logic.
Subforms can be challenging and complex, but they are what make dynamic documents dynamic. Without subforms and tables, which are just a type of subform, you wouldn’t be able to create dynamic documents that grow and shrink based on data or user interaction.
Hidden and invisible subforms
You can hide and show subforms by setting the Presence property. The three most common values for the Presence property are Visible, Hidden (Exclude from Layout), and Invisible. Depending on the option you choose for the Presence property and the Content property of the parent subform, different effects will result.

Consider the four scenarios illustrated here.
- In example #1, the parent is set to Flowed and all children are set to Visible.
- In example #2, the parent is also set to Flowed but childSubformB is set to Hidden (Exclude from Layout). This will cause childSubformC and all subsequent subforms to automatically move up in the form to occupy the position previously held by childSubformB.
- In example #3, the parent is also set to Flowed but childSubformB is set to Invisible. It is true that childSubformB has disappeared but notice that childSubformC hasn’t moved up like it did in the previous example. An object set to Invisible will still retain its place in the layout, it will simply not appear.
- In example #4, the parent is now set to Positioned so all child subforms will maintain their X and Y position relative to the parent. Even when childSubformB is set to Hidden (Exclude from Layout) childSubformC will not move up. A subform is only truly hidden when its parent is set to flowed.
Pagination and Subform Flow Is Different in HTML Forms
Pagination and subform flow work differently in the HTML renderings of your Designer files than they do in the PDF renderings. For instance, the repeating expense rows of the SmartDoc Expense Report will flow from page to page in a PDF rendering of the form. However, in the HTML rendering, these repeating rows will simply repeat on the same HTML page without flowing to a secondary page.
Tables
Tables in Designer are a lot like tables in a word processing program. You can use tables to organize data into a structured grid of related objects. But in Designer, tables are also complex container objects, so you can work with them just like you work with subforms.
The Table menu and Table object
You can add a simple table to your form in either of the following ways.
- Click the Table menu and select Insert Table (left)
- Drag and drop a Table object from the Standard Object Library onto your form (right)

In both cases, Designer will launch the Insert Table dialog box. The Insert Table dialog box enables you to create a simple table or to launch the Table Assistant.
The Table Assistant
The Table Assistant is a multipage wizard tool, and it provides more features and additional information about tables. One of the additional tools in the Table Assistant is the Row Shading page, which enables you to set different colors for alternating rows. This is a useful design method to use on your forms. Changing the colors on alternating rows makes it easier for your users to read and comprehend table-based data.

